| Linked Stops for Live Overhead |
These applications, used for two trams travelling in opposite or different directions, still employ the same cut rails principle but require many more cuts to make them work than those examples on the single stops page.
In the following illustrations the overhead wire has been omitted, live rail and tram wheels are coloured red and dead / unpowered rail and tram wheels are coloured black and trams are represented by one axle only.
It is advisable to add a switched feed from the controller to the short rail so the automatic sections can be made live if needed. As before this is achieved using an On-Off-On switch with the track connected to the centre contact, the controller to one end contact and the switch section to the other end contact.
| Automatic Single Line Access |

|
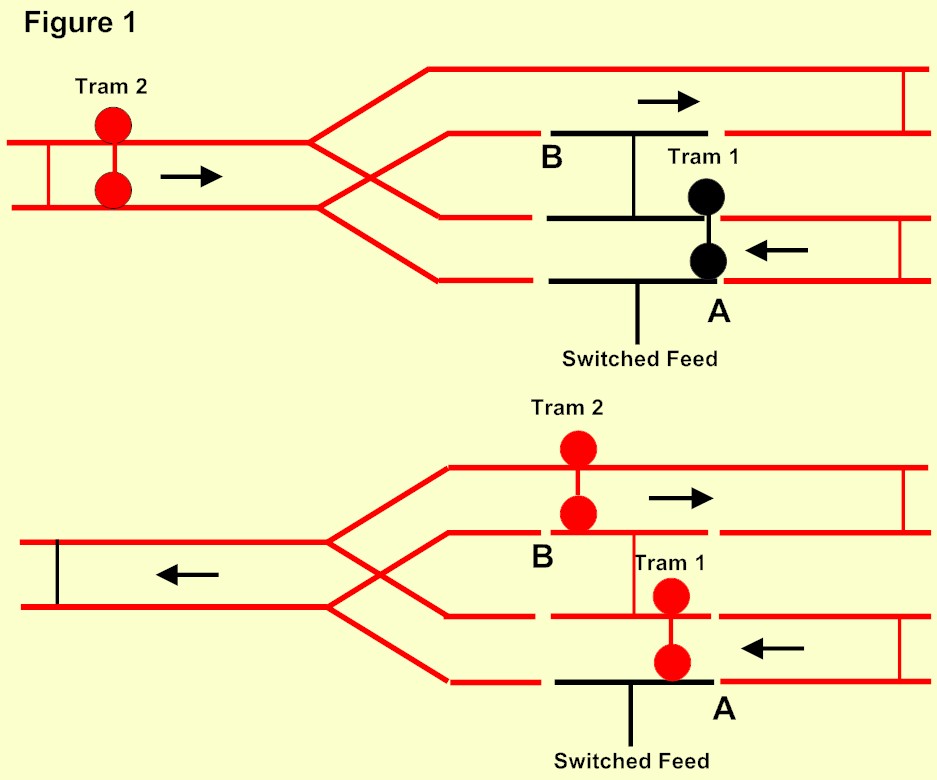
Figure 1 is a development of the remote automatic stop / start shown in Figure 4 on the previous page where the trams are going in opposite directions. It shows the 6 rail cuts and electrical link needed.
This arrangement is used to make Tram 1, which has stopped on a double track section at A, move only after Tram 2 has arrived from the single track at B. To avoid collisions cut B should to be at least one tram length away from the turnout.
|
Both trams are still powered by the same controller. This method is used at the ends of the town section on our freelance 00 tramway Foxwood Park and on the Park stop on Beamish.
| Automatic Single Line Access with Stops Both Ways |

|
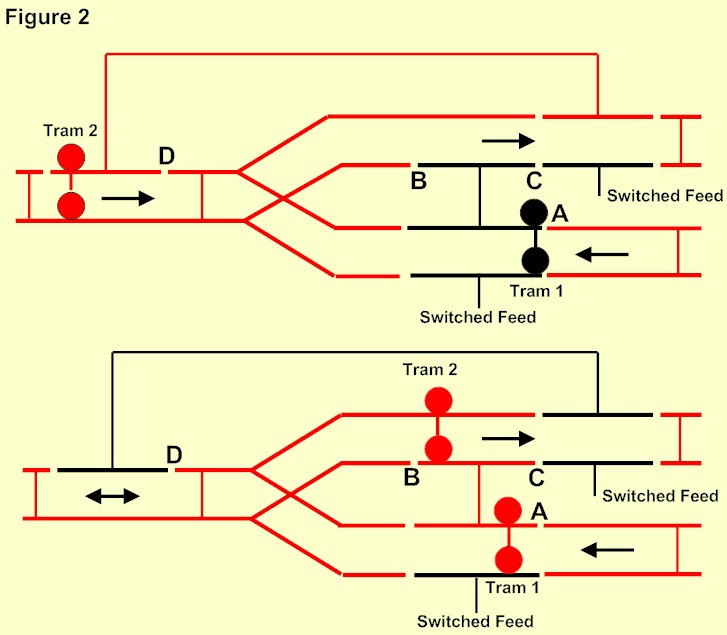
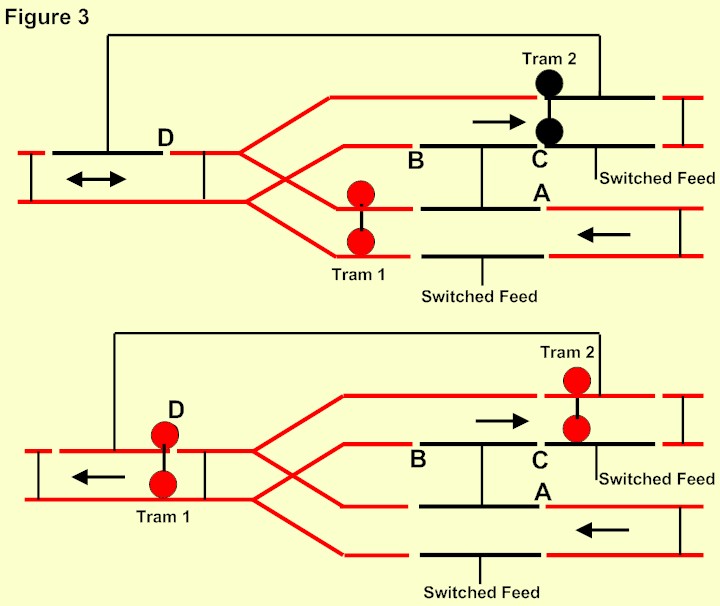
Figures 2 and 3 show how the 'Automatic Single Line Access' can be improved so both trams stop and are started by the other. Both Figure 2 and 3 show the rail cuts and electrical links needed.
To avoid collisions cut B should be at least one tram length away from the turnout frog and cut D will should be as far away as possible to allow tram 2 loading time at the stop.
Figure 2 shows how Tram 2 stops at C, after it leaves the single line section and releases Tram 1.
|

|
Figure 3 shows how Tram 1, when it gets to D, releases Tram 2 which has stopped at C.
This scheme does not work if Tram 2 arrives first because it has already passed the trigger section for Tram 1, but it is fail safe in that both trams will remain at their stops.
When our freelance 00 tramway Foxwood Park was built, both ends of the town section were wired this way, so there are four automatic stops.
However once running it was found that only the two stops at A were required so the other two stops at B are overridden using the switched feed.
|
| Automatic Passing Loop with Stops Both Ways |

|
For those who would like to work out the tram moves for themselves, Figure 4 shows the 16 rail cuts and the wiring connections needed for a fully automatic passing loop.
|
This application works whichever tram arrives first but some experiments will be required to establish the best placing of trigger sections A and B, which should be as far away as possible, so that the trams have a reasonable loading time at the stops.
Should both trams arrive at the same time, the system fails safe as both trams will remain at their stops. This method was used for the passing loop on Foxwood Park which in 2009 was believed to be the first working application of the cut rails method to an automatic passing loop.
| Automatic Double Track Crossing - 1 |

|
Figures 5 and 6 have been added after a Contact page enquiry from Australia asking if the cut rails method could be used to prevent collisions at a double track crossing.
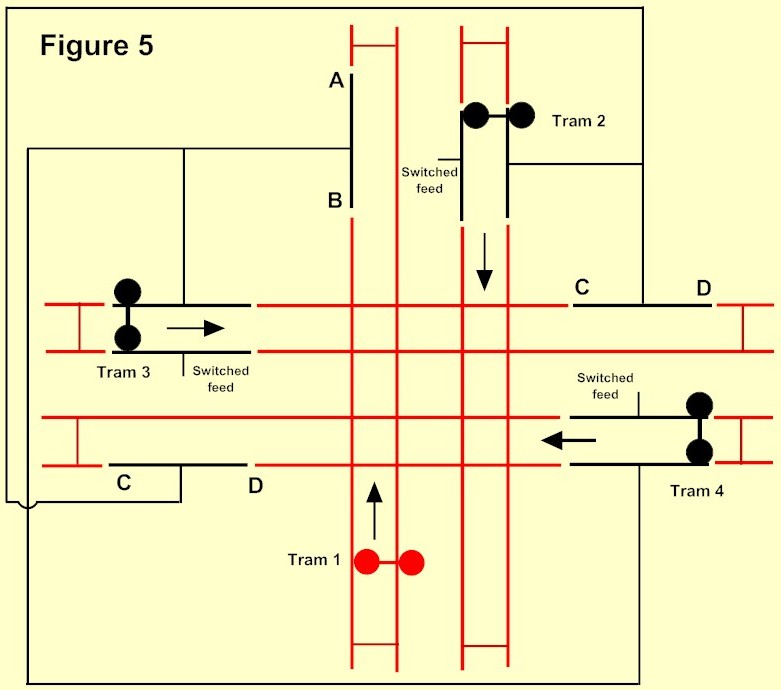
Figure 5 shows the 18 rail cuts and links required if Tram 1 has control of movements over the crossing. It is on the only track without a stop and all other trams arriving at the crossing will stop until they are released by another tram.
Trams 3 and 4 will be released by Tram 1 after it has reached the trigger section AB and Tram 2 is released when either Tram 3 or Tram 4 has reached trigger section CD.
The trigger sections AB and CD should be, within reason, as long as possible and at least one tram length away from the crossing to avoid collisions.
|
| Automatic Double Track Crossing - 2 |

|
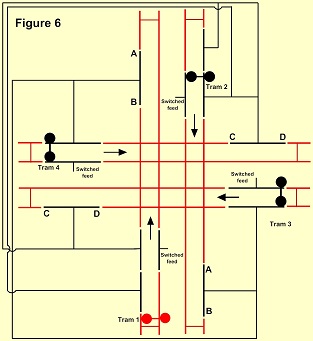
Figure 6 shows the 26 rail cuts and links required for more flexible operation where both Trams 1 and 2 are able to control movements over the crossing no matter which one arrives first.
If Tram 1 arrives first it will stop until released by Tram 2 which will then stop. Tram 1 will then release Trams 3 and 4. The first one to reach CD will release Tram 2.
If Tram 2 arrives first it will stop until released by Tram 1 which will then stop. Tram 2 will then release Trams 3 and 4. The first one to reach CD will release Tram 1.
The trigger sections AB and CD should be, within reason, as long as possible and at least one tram length away from the crossing to avoid collisions.
This figure should work without any collisions but needs to be confirmed, so if anyone has tried it please let me know through the Contact page.
|
| Automatic Double Track Junction |

|
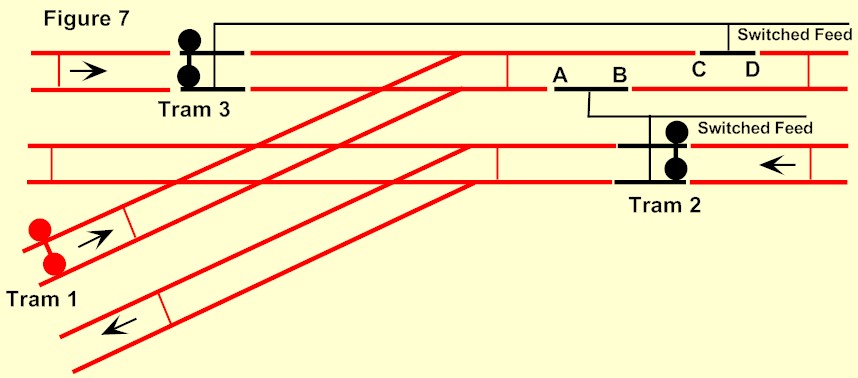
Figures 7, 8 and 9 have been added after a Contact page enquiry from Folkestone asking if the cut rails method could be used to prevent collisions at a double track junction.
Figure 7 shows Trams 2 and 3 at their stops and Tram 1, on the only track approaching the junction without a stop, controls the movements of the other two over the junction.
|

|
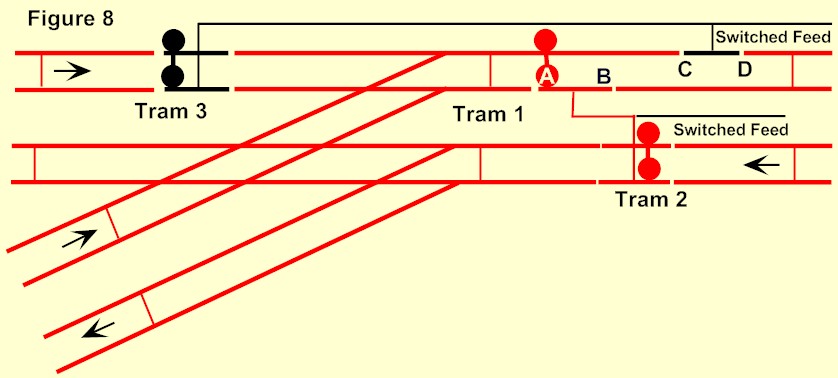
Figure 8 shows Tram 2 released by Tram 1 when it reaches the first trigger section AB.
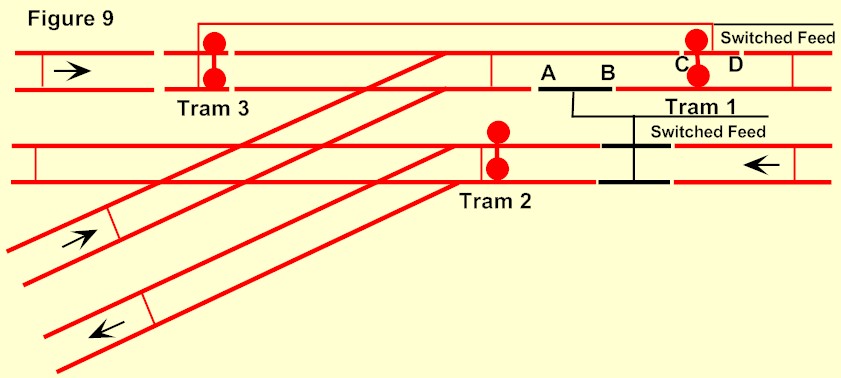
The trigger sections AB and CD should be as long as possible and placed a suitable distance from the junction.
|

|
Figure 9 shows Tram 3 released by Tram 1 when it reaches the second trigger section CD.
|
These explanations should help if you want to run trams prototypically from the overhead as an addition to your railway. If you have any questions about automatic tram stops, please use the Contact page to ask and you will get a reply.
© Gordon Bulmer 2024
